The first time I attempted this recipe, I was a bit nervous (who wouldn’t be when frying chicken?). But I went in with confidence and some delicious seasonings! I nailed it on the first try, and the kitchen smelled like a cozy diner. One little surprise was how crispy the tenders became—definitely a pleasant shock! The only tweak I made for my second round was adding a touch more seasoning to the flour mixture. It gave the tenders an extra zing that my taste buds absolutely adored!
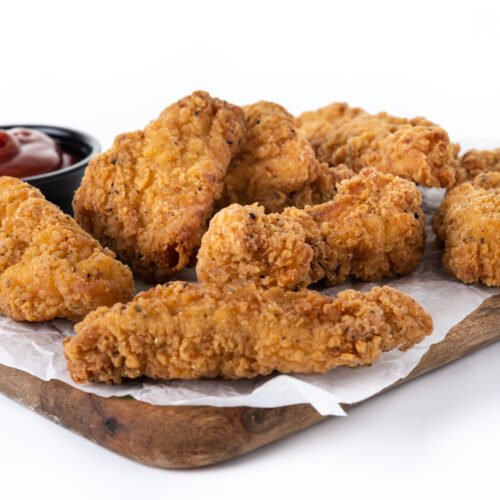
Chicken Tenders
Ingredients
- 1 lb boneless skinless chicken breasts (or chicken thighs for juiciness)
- 1 cup all-purpose flour
- 2 large eggs
- 1 cup breadcrumbs Panko for extra crunch or crushed cornflakes for a fun twist!
- 1 tsp garlic powder
- 1 tsp onion powder
- 1 tsp paprika
- Salt and pepper to taste
- Oil for frying vegetable or canola works wonders
Instructions
- Prep the Chicken: Start by slicing your chicken breasts into strips. Aim for about 1 inch in width for even cooking.
- Set Up Your Stations: You’ll need three bowls: one for flour, one for eggs, and another for breadcrumbs. Season the flour with garlic powder, onion powder, paprika, salt, and pepper. Give it a little mix to spread the flavor.
- Get Dipping: Take a chicken strip, dip it in the flour first, making sure it's coated well. Next, plunge it into the egg, letting the excess drip off. Lastly, roll it in the breadcrumbs until it’s all coated up!
- Fry Time: In a large skillet, heat about ½ inch of oil over medium heat. Once it’s shimmering, it’s time to fry! Carefully place your chicken tenders into the oil, cooking in batches if needed, for about 3-4 minutes on each side until golden brown.
- Drain the Excess Oil: Once they’re perfectly crispy, remove them from the skillet and place them on a plate lined with paper towels to soak up extra oil.
- Dive In: Serve the chicken tenders hot with your favorite dipping sauces—barbecue, honey mustard, or ranch! Enjoy every crunchy bite!
Nutrition Facts
| Nutrition Component | Amount per serving |
|---|---|
| Calories | 320 |
| Protein | 26g |
| Carbohydrates | 30g |
| Fat | 12g |
| Saturated Fat | 2g |
| Sodium | 600mg |
5 Tips for This Recipe
- For extra crispy tenders, let the breaded strips rest for a few minutes before frying.
- Use a thermometer to make sure the oil is at the right temperature—about 350°F for perfect frying.
- Try adding different herbs or spices to the flour for a unique flavor twist!
- Make sure not to overcrowd the pan while frying—this keeps the oil temperature steady.
- If you want to bake instead of fry, use a preheated oven at 400°F for about 20-25 minutes!
5 FAQs for This Recipe
- Can I use frozen chicken? Absolutely! Just be sure to thaw it completely before coating and frying.
- How can I make this recipe healthier? Baking instead of frying and using whole wheat breadcrumbs are great options!
- What dipping sauces go well with chicken tenders? Honey mustard, barbecue sauce, and ranch are fan favorites!
- Can I prepare the tenders ahead of time? Yes, you can bread them and store them in the fridge for up to 2 hours before frying.
- How should I store leftovers? Keep them in an airtight container in the fridge for up to 3 days.
5 Storage Tips
- Let chicken tenders cool completely before storing in the fridge.
- Use parchment paper between layers to avoid sticking if stacking them in a container.
- Wrap tightly in aluminum foil for extra protection against air exposure.
- Label your leftovers with a date to keep track of freshness.
- Freeze tenders by laying them on a baking sheet until firm, then transfer to a freezer-safe bag!
5 Common Cooking Mistakes
- Using cold chicken straight from the fridge—let it sit for about 15 minutes at room temperature.
- Not seasoning the flour mixture, which can result in bland tenders.
- Overcrowding the pan, leading to soggy chicken instead of crispy goodness.
- Skipping the egg dip; it helps the breadcrumbs stick and gives that perfect crunch.
- Frying at too high or too low of a temperature—keep it steady for best results!
Final Thoughts
And there you have it! A simple yet delicious recipe for chicken tenders that anyone can master. We had some fun, didn’t we? Not only did we learn how to create crunchy, flavorful bites, but we also got the chance to experiment in the kitchen and add our personal touch.
Whether you’re serving these tenders for a weeknight dinner or putting them on the snack table for game day, they’re sure to be a hit! Remember to take your time, follow the steps, and most importantly, enjoy the process.
Now, go forth and make those chicken tenders shine—your taste buds will thank you!