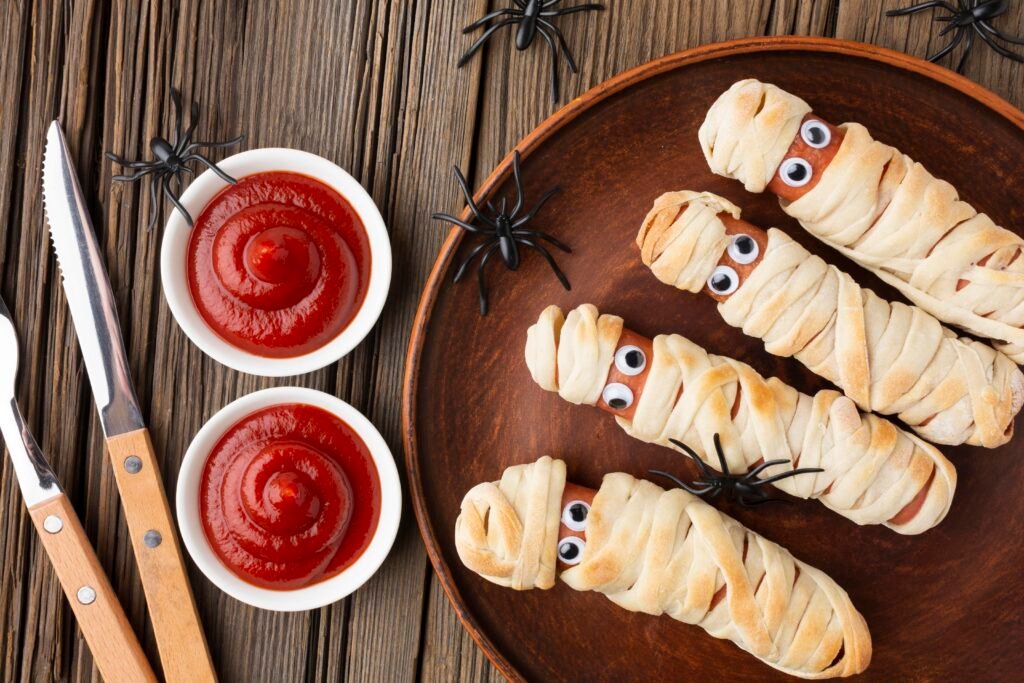
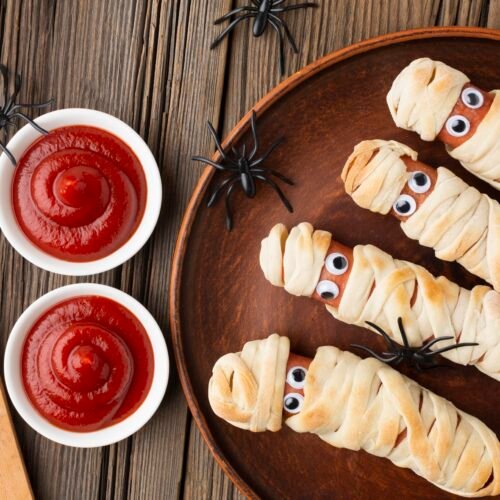
When I decided to whip up these adorable Mummy Hot Dogs, I was excited to see how they would turn out. I remember gathering my ingredients and thinking about how much fun my kiddos would have devouring these little mummies. As it turns out, I nailed it the first time! The crescent dough wrapped around the hot dogs created just the right amount of cuteness and crunch.
However, I did run into a couple of surprises. First, I realized that cutting the crescent dough into thin strips was a bit trickier than I expected. I made a few thicker strips that couldn’t wrap around as well. So, my first tip based on that is to really go for those thin strips!
After a little brainstorming, I also decided to use mustard and ketchup for eyes, which really added to the cuteness and flavor. My kiddos loved dipping their mummies into extra ketchup. I might just make these for any get-together from now on!
Mummy Hot Dogs
Ingredients
- 1 can of crescent roll dough or puff pastry for a flakier texture
- 12 hot dogs you can use regular, turkey, or veggie dogs
- Mustard or ketchup for eyes or mini chocolate chips
- Cooking spray or olive oil to grease the baking sheet
- Substitutions: Instead of hot dogs you can use pre-made sausage rolls or even a veggie sausage for a meat-free option. If you prefer no dough, try using tortillas for a crunchy wrap!
Instructions
- Preheat the Oven: First off, let’s set that oven to preheat at 375°F (190°C). This way, it’ll be nice and hot when we’re ready to bake.
- Prep Your Baking Sheet: Take a baking sheet and either coat it with a bit of cooking spray or lightly drizzle some olive oil. This will keep our mummies from sticking!
- Unroll the Dough: Now let’s open the can of crescent roll dough. Be careful; it can pop open unexpectedly and scare you a little!
- Cut the Dough: Using a pizza cutter or sharp knife, slice the crescent roll dough into thin strips, about ½ inch wide. The thinner, the better, as they’ll wrap around the hot dogs easier!
- Wrap the Hot Dogs: Take each hot dog and start wrapping it with the dough strips. Make sure to leave a little space at the top for the eyes to peek through. It doesn’t have to be perfect—have fun with it!
- Place Them on the Baking Sheet: Lay each wrapped hot dog on the greased baking sheet, making sure they aren't touching too much (we want them to crisp up nicely!).
- Bake 'Em Up: Pop those mummies into the oven for about 12-15 minutes or until the dough is golden brown and the hot dogs are heated through. Keep an eye on them so they don’t get too brown!
- Add the Eyes: Once they’re baked, let them cool for a minute. Then, using mustard, ketchup, or mini chocolate chips, dot some “eyes” on your little mummies. So cute!
- Enjoy: Serve with your favorite dipping sauces and dig in!
Nutrition Facts
| Serving Size | 1 Mummy Hot Dog |
|---|---|
| Calories | 124 |
| Total Fat | 8g |
| Saturated Fat | 3g |
| Cholesterol | 25mg |
| Sodium | 362mg |
| Total Carbohydrates | 8g |
| Dietary Fiber | 0g |
| Sugars | 0g |
| Protein | 4g |
Tips for This Recipe
- Make sure to cut the dough into thin strips for easier wrapping!
- Use a mix of different hot dog varieties for added fun!
- Don’t overbake; you want them golden, not burnt!
- Get creative with toppings—try using olives or cherry tomatoes for spooky eyes!
- Serve with different dipping sauces for variety!
FAQs
- Can I use something other than hot dogs? Absolutely! Try sausages, veggie dogs, or even cheese sticks!
- How do I store leftovers? Keep them in an airtight container in the fridge for up to 3 days.
- Can I freeze these? Yes! Freeze unbaked wrapped hot dogs, then bake directly from frozen. Just add a few minutes to the baking time.
- Can I make them ahead of time? You can prepare and wrap them ahead, just bake right before serving for the best taste!
- What’s a fun dip to serve with these? Try a homemade BBQ sauce or a spooky green avocado dip!
Storage Tips
- Store in an airtight container for freshness.
- Use parchment paper between layers if stacking to prevent sticking.
- Keep away from moisture to avoid sogginess.
- Label and date containers if freezing.
- Reheat in the oven for the best texture instead of the microwave!
Common Cooking Mistakes
- Rolling the dough too thick; keep it thin for crispiness!
- Not preheating the oven; this could lead to uneven cooking.
- Forgetting to leave a space for the eyes; make sure to leave them visible!
- Piling them too closely on the baking sheet; give them some room to breathe!
- Not using enough grease on the pan, which could lead to sticking.
Final Thoughts
Making Mummy Hot Dogs is not just about cooking; it’s a fun experience that you can share with friends and family. We all enjoyed wrapping the dough around the hot dogs and creating those spooky little mummies. Even if it’s not Halloween, these delightful snacks can light up any gathering! I’m definitely planning to make them again because they were so easy and tasty. Plus, the kids loved them, and that’s all that matters!
Next time you’re looking for a fun snack, whip up these Mummy Hot Dogs and make some memories in the kitchen. Who knows, this could become one of our new family traditions!
Don’t forget to encourage your creativity while cooking. It’s all about having fun, right? Happy Mummy-making!